AWS Site-to-Site VPN with a Ubiquiti Dream Machine
In my previous post I made use of an AWS Site-to-Site VPN as part of my solution to perform TimeMachine backups between my Mac and an EFS volume. I did not go into too much detail on the setup of the VPN, so I thought I’d do that here. I will be setting up the VPN between my home router and an AWS VPC in the Cape Town region. My current home router is a Ubiquiti Dream Machine (UDM), but you can do this with most home routers, and of course enterprise grade solutions.
The AWS documentation for setting up a Site-to-Site VPN is well written and really helpful. You will however find that your issue is with configuring your home router. At least that took some figuring out for me. It is important that you understand what you are doing when changing your home router settings. A misconfigured home router can leave you vulnerable to attacks. I always thought the likelihood of someone attacking my home network is slim to none. According to my UDM’s threat detection and prevention system, I was wrong! Five medium risk threats were detected and blocked by the router in the last few weeks.
AWS Site-to-Site VPN Concepts
There are three core components on the AWS side of a Site-to-Site VPN. The Customer Gateway, Virtual Private Gateway, and the actual VPN Connection. The Customer Gateway is basically just an entity that holds the information about your home or office router setup, the Virtual Private Gateway is the virtual entity on the VPC side of things, and the VPN connection brings it all together and establishes the VPN tunnels between these entities.
The first question you will encounter is whether to use static or dynamic routing. Interestingly, the UDM does not support the Border Gateway Protocol (BGP) — at least it didn’t at the time of writing this — so I went with static routing. In simple terms this just means that if my home IP were to change, the VPN connection will be lost. With the UDM Pro you can configure multiple WAN’s for failover in the event of an ISP outage. If a multi-WAN setup is configured, it is possible to add both as static routes so that the VPN will failover as well.
Following the AWS documentation for creating the Customer Gateway and Virtual Private Gateway is pretty straight forward. When creating the Customer Gateway I selected static routing, provided my static IP address, and the optional device name. You can leave the “Certificate ARN” field blank, unless you prefer to use certificate authentication over using a pre-shared key. The Virtual Private Gateway is also dead simple to create. Provide a name and select “Amazon default ASN.” The last thing you need to do before you can create the Site-to-Site VPN is to enable route propagation on your route table. As mentioned in my previous post, I tend to leave the networking components AWS creates by default and setup a new VPC from scratch. Just make sure to enable route propagation for a route table that will be associated with the subnets your resources will be deployed into.
The last thing to do on the AWS side is to create the Site-to-Site VPN. Again, just following along with the AWS documentation should do the trick. Be sure to select “Static” as the Routing Option, enter your home or office static IP address, and provide the value of the pre-shared key for both tunnel one and two. I left most of the fields blank or default for a start. I just wanted to get the connection established before fiddling around with the settings. I also had to read up a whole lot on all of that to understand what I am actually changing. The pre-shared key is basically just a password you choose and provide in both the above step and on the UDM side. You can make it whatever you want, but it is obviously advised to pick something decent. You will be billed from the moment the VPN connection is created and in available state, regardless of wether or not the VPN tunnels are actually up or if the connection is working.
The first time I created a connection the console displayed some errors and the page didn’t allow me to click away. But refreshing the page took me back to the connection list page and I could view the connection details. I think it was due to the fact that my router wasn’t configured yet, so the VPN tunnels couldn’t establish a connection, but I’m not sure. The last thing I had to do was to add my static IP as a route on the VPN connection. The route propagation you enabled earlier will propagate the route to the route table and ensure that you will be able to connect to resources in your VPC.
Configuring the Ubiquiti Dream Machine
This is where I had the most issues. The Ubiquiti documentation for setting up a VPN was not great. I want to say useless, but I suppose it did help a little. Part of the issue is differences in the UI between different versions of the router OS. My bigger frustration is that most things are explain to the point where you can “do what you need to do” but not really to the point where you understand what you are doing. Anyway, enough complaining about Ubiquiti documentation. Before we begin, my current version of UniFi OS is 1.10.4, so if you are running a different version your UI will probably look different. At least you can follow along to see what values should be entered into specific fields.
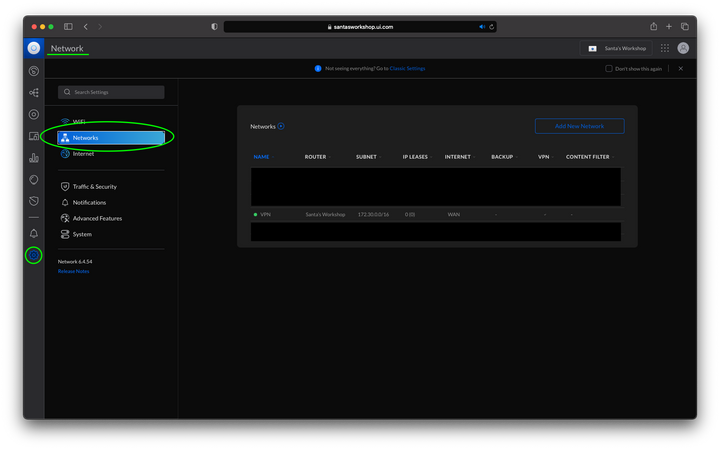
Like with most things in life, it’s actually pretty easy when you know what to do. Once in the “Network” section of the OS, navigate to Settings and then Network.
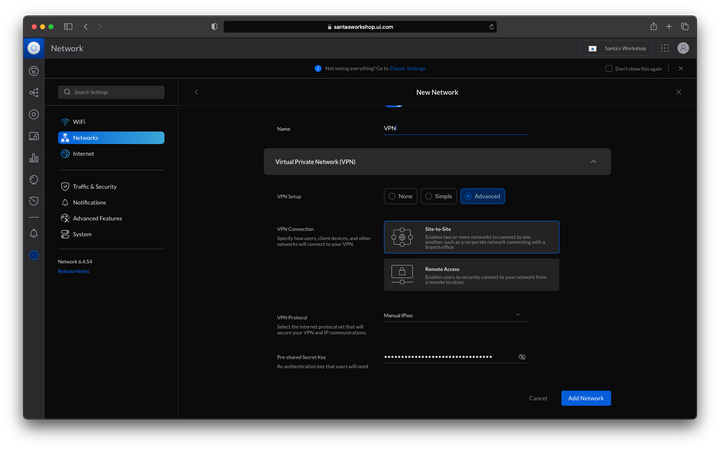
At the top right of the Network page, select “Add New Network”. Choose a name for your network and choose “Virtual Private Network (VPN) from the network options. Select “Advanced” for VPN Setup and “Site-to-Site” for VPN Connection. You should see something as below. Note that the pre-shared key is automatically generated by UniFi OS. You can choose to view the password and use that when configuring the VPN Tunnels on the AWS side, but you can use your own key as well.
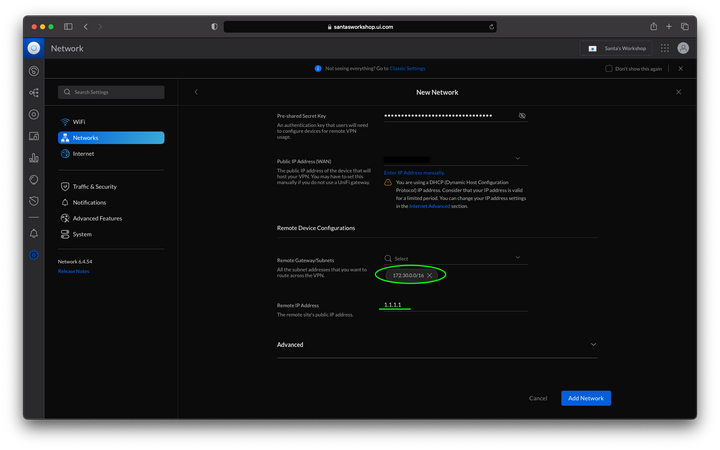
The “Public IP Address (WAN)” field should be pre-populated with your default WAN IP, i.e. your home or office static IP address. “Remote Gateway/Subnets” is where you enter your VPC CIDR block. In my case I have a /16 network with CIDR 172.30.0.0. Lastly, the public IP address of which ever VPN tunnel you’d like to use should be entered into the “Remote IP Address” field. In the screenshot below I entered 1.1.1.1 as an example. The AWS VPN connection has two tunnels, so if you want to setup both for failover, you will have to create another VPN connection following the same steps as described above.
If you expand the “Advanced” section and scroll to the bottom you will see a very misleading configuration item. “Dynamic Routing” is not what you think it is, it does not mean there is BGP support. I did leave it enabled though. Click on “Add Network” right at the bottom and you should be good to go.
It is fairly simple to configure an AWS Site-to-Site VPN between your VPC and a Ubiquiti Dream Machine, if you know what to do of course. The VPN is not that expensive and it enables you to interact with your private AWS resources securely. Remember to allow connections from your IP address on the Security Groups protecting your resources. Once you have this basic configuration up and running you can start tweaking the settings of the VPN connection itself to make it more secure, as well as setting up your UDM to only allow traffic to and from certain local networks and devices.
PS: Yes, my router is called Santa’s Workshop. If you are wondering how I got the URL to display the router_name.ui.com, it’s a simple forward in /etc/hosts.


